Start-Up And Adjusting
Make sure that the kit is completely installed, with the air cleaner back on, and the choke cable installed (remember to finger tighten the cables big nut to the bracket). Turn on the petcock, and check for fuel leaks. During the carb's setup on the bench, the mixture screw should have been screwed out 3 1/4 turns, and the idle speed screw on the side should be adjusted so that the butterfly is just exposing the first of the (5) pilot transition feed holes (this should have already been setup on the work bench!). Ignition timing should have already been correctly set. See my ignition timing section here! Fully retard the left ignition timing grip, fully pull on the choke cable, and pump the throttle 3-4 times. Give it 2 priming kicks, turn on the ignition switch, and kick. It should start right up with a fast idle. Slowly advance the ignition, and simultaneously reduce the amount of choke as the motor warms up. The carb needs to have some choke for a couple of minutes until the motor is fully warmed up. This is normal for H-Ds also. With the timing retarded about half, adjust the idle speed screw for a nice idle. Trim the mixture screw first by screwing it inward (lean), until the idle speed drops some. Slowly start screwing the mixture screw out (richer) until you have reached the fastest, and smoothest idle. This procedure is needed after every idle speed screw re-adjustment. I recommend setting up the "Retard Limiter" (see my explanation here in the timing section) so that there isn't the full 39 degrees of timing from the grip. With about 22-23 degrees spread, the idle speeds at full advance and full retard will be closer to the same. This makes for a Happier bike. When re-starting the bike when warm, always fully retard the timing, sometimes pull on a little choke, give it no throttle, and kick. You will be amazed how smooth the bike sounds!
Ignition Timing
The ignition timing issue is going to be very controversial to many people, because the results I found experimenting with timing are nowhere near the marks dictated by the factory. Since we no longer use the same fuel they used in the 1940's, and we are now using a modern efficient carb, we need to start from scratch. Long before I experimented with CV carbs, I was testing my Linkert for less advance, and leaner mixture for more power, and smoother running. Several years ago while on a 1,000 mile Sierras, and Nevada cruise I started playing with timing, and mixture. I kept dialing out some advance, and trimming my high speed needle for the best seat of the pants feel, and when I returned home to measure the timing, I found that I was a little below 30 degrees full advance. The factory has different settings for various motors, and they are all above 35 degrees! The 80" motor by the book is 11/16" before TDC, which equals 40 1/2 degrees. These numbers are far too high, and will cause severe heat inducing detonation, and a loss of power. I have found from extensive dyno testing here that Indians are most efficient at much less ignition advance than factory settings. Indians have very little compression, which requires less advance, and the fine atomization from the CV carb requires less timing to fully fire the fuel. Any excess advance in a motor just results in a burn too soon where some of the power is lost on the wrong side of TDC. When this happens, extra heat builds up, causing excess wear, and hot oil. A little more advance, and you get destructive detonation. I found an additional 15% torque, and horsepower just by retarding the ignition. Now there is another advance issue that must be addressed. The stock Indian advance mechanism sweeps a full 39 degrees of advance from full advance to full retard. This would be fine in the old days with the factory timing marks of around 38 ($) degrees, it would retard down to 1 degree after TDC for idle. But with timing fully advanced at only 23-24 degrees with the CV carb, the full retard would be at 16 degrees after TDC and the idle would be very incorrect. My CV installation kits include a "D" shaped piece that fits into the curved slot of the upper timing bracket to cut the amount of advance nearly in half (only 22-23degrees). Now the idle speed is adjusted at full retard (TDC), and when advanced, the idle speed only comes up a little bit, but sounds great. You come up to a stop light, and fully retard the timing, and the bike idles very smoothly. Click it in gear, advance it, and take off, and it feels very nice.
Modifying the Flywheels into "Degree Wheels"
I found a handy way to turn your flywheel into a degree wheel for acurrate timing, is to stamp some marks on the flywheel through the inspection hole with a spring loaded punch, and a simple to make guage strip. Make a short sheet metal strip about 3" long, and 21/64" wide (.328) as a guage. Cut it, file it, and measure it accurately. This guages width represents 5 degrees of crank timing, when placed in the center of the timing hole. Assuming the factory TDC mark (+) is correct, this guage can be held in place up against the TDC mark on it's right edge, and the left edge is now at 5 degrees before TDC. Carefully mark, and gently center punch this mark. Continue moving to your left making new 5 degree marks as you go, and eventually you will see the original ($) timing mark at around 38 degrees. Now paint very thin vertical lines at each 10 degree increment (TDC,10,20,30,etc.) with different colored paints (whited=TDC,yellow=10,orange=20,red=30). You will be delighted at what you will see through the clear plastic plug with your timing light.
Clear Plastic Timing Plugs can be bought from Ed Glasgow for $10.00 each. He can be reached at 1-315-696-8076.
A simple way to approximate 19 Degrees Timing
For those that don't want to get as involved with the timing marks mentioned above, there is a simpler way. Assumming that your (+) mark for TDC is near correct, and your($) full advance timing mark is near correct at 38 degrees, you can split the difference, and find 19 degrees before TDC. Look in the inspection hole for both marks, and put a new mark exactly between the two of these, and this is where 19 degrees would be. Now place a mark 1/4" to the left for 23 degrees. The CV carb will work at its best here at 23 degrees. Simple!
Advance Bracket Timing Limiter Modification
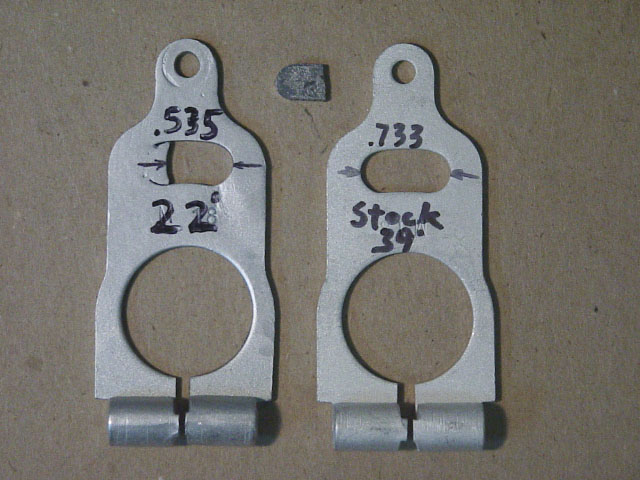
Study the picture of a standard Chief advance bracket, and the one that I modified for half the travel. The advance cable moves this part against the sides of the special shouldered bolt that holds the advance mechanism all together. I cut-out a small piece of .100" thick steel to fit into the slotted groove on the side where retard sits, and I tack welded it in. It needs to be sanded down smooth so the mechanism will move freely as original. The curved portion on the advanced side needs to still fit nicely against the radius of the shouldered bolt, because the two pieces are in constant contact with each other the whole time you are riding. Therefore, the edge of this new piece where retard sits is rarely used, and this surface can be trimmed back after welding with a file, or Dremmel tool to achieve the .535" width to limit the advance travel to half of original, around 22 degrees.
The distributor must be removed before this part can be modified. First pull off the distributor cap, and rotate the motor around so the rotor is pointing forward (for later referance). Place an identifying mark on the distributor body, and on the advance bracket adjacent to each other so you can put the bracket back on in the same place. Remove the advance cable, and take out the shouldered bolt. Do not remove the lower clamp that is tight to the oil pump! After modifying the bracket, and re-installing it on the distributor, drop the distributor back into the oil pump with the rotor again pointing forward. This should retain your original full advance timing position. Re-time the full advance for 23 degrees.
This Mod is required for proper operation. It will run, and start without it, but you will not like how the bike idles at full retard. Just Do IT!
Recommended Jetting Specifications
As I have mentioned before, all of my research, and developement has been done using the Yost "Power Tube" jet kit that I recommend. It is the kit for generic Harly-Davidson Big Twin Evo's which are closest to the state-of-tune of our old Chiefs. I have never, nor will I ever run one of these carbs without this kit, because the Yost "Power Tube" factory did the research to give back the power, and drivability to this carb that was lost while making it pass strict California emissions tests. This jet kit on the H-D's added back 24.5% more power to an Evo motor when used with a K&N Filter! I want the same increase in power, and throttle response on my bike, as I am sure you will too! The carb in it's stock form runs poorly (too lean), and the other jet kits REALLY don't work on Chiefs!
All of the Harley-Davidson jetting is replaced with the Yost "Power Tube" jet kit. The pilot jet needs to be increased from a #42 to a #45 in all cases, and the main jet should be 175 for sea level, and 175 for high elevation (a 175 is best for all-around riding on 74's, and a 185 for80's). I have tried using, and modifying stock jetting with bigger jets, and small washers to raise the needle. None of this works. You need the new needle profile, and the new design emulsion tube found in the jet kit for best performance.
Otherwise, here are the preferred jetting specs using the Yost "Power Tube" jet kit. The new diaphram spring is the same as stock (never use a lighter spring!), a weak spring allows the slide to raise quicker, which makes the mixture too rich. The small hole on the bottom of the slide is opened up some to quicken the opening of the slide. The Yost "Power Tube" jet kit comes with a .110" drill that is just right for the Chief application. This allows for a stronger vacuum signal, and thus, quicker throttle response. The new needle has (6) adjustment slots, and we use the (3rd) from the top. For bigger motors, like an 80", or use in very hot weather, use the 4th clip down. You will need to ride-test both settings to see which one the bike likes best. A new "emulsion tube" for the needle is included, which is the secret to success for this jet kit. It has a "Zillion" super small holes drilled into a "tube within a tube" for better atomization of the fuel. H-D jets are coarse thread, and will interchange with the Yost "Power Tube" jet kit if needed. The main jet is 175 for high elevation, 185 for 80" motors, and hot sea level. Some guys are using the 185 for their 84" motors. Again, the pilot jet should be increased to a #45, and this does not come in the jet kit. It can be bought at any H-D Dealer. Set the mixture at 3 1/4 turns out. That's It!
Important-Read Each Catagory Below for Full Details!