The Keihin 41mm CV Carb Kit
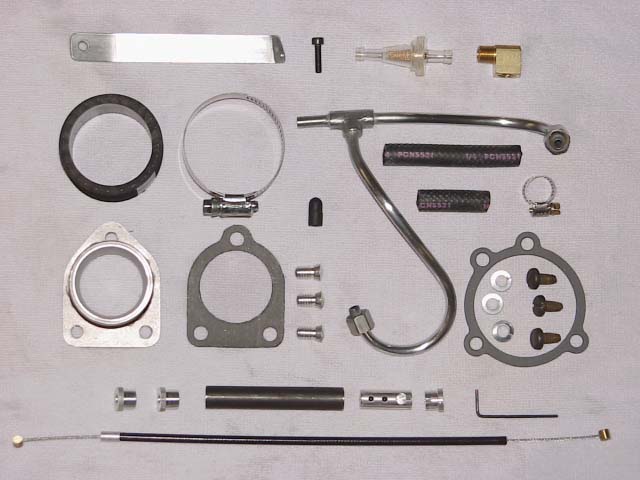
The Manifold
I hand make a manifold from steel that takes the place of the original Linkert carb, and it is "port matched" to both the Indian manifold, and to the Keihin carb. The manifiold was designed to hold the carb as close to the motor as possible, and although there is a little grinding required on the carbs cable linkage for clearance, the air cleaner sits only about 1/2" farther out than stock.
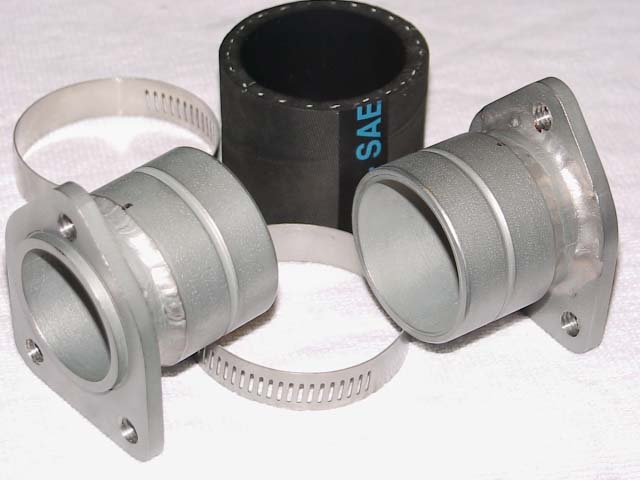
The Rubber Sleeve
I found a rubber tubing that is used as boat exhaust that is plyable, resists heat, fuel, and oil. Two common 2 1/4" heavy duty hose clamps are used. Fully push the tube onto the carb, and clamp tight. Then fully push the tube over the manifold until the carb meets the manifold, and clamp tight. I like to use a press to gently push the manifold adapter against the carb, then tighten the clamps. I position the clamp screw heads at the 5 O'clock position with the screw end pointing downward.
Screws And Gaskets
A thick manifold gasket is included as well as a gasket to go between the carb and air cleaner. (3) screws and lock washers for the air cleaner are included, and (3) special tapered screws are provided for mounting the new manifold to the Indian manifold. These have an undercut at the base of the taper, so you will not run out of threads on old worn out Indian manifolds, which can cause a vacuum leak.
Carb Support Bracket And Screw
A special support brace, and hex allen screw for the float bowl are included. The brace mounts to the small through-bolt in the engine cases, like the original brace. The other end mounts to the right-rear screw of the float bowl. A longer metric hex screw is included, and should be tightened well. It is best to first loosen the Indian manifold nuts a little to position the carb correctly while tightening the brace screw, then retighten the manifold nuts. I like to use some "Permatex Hylomar HPF " sealent (a fuel-proof thick blue gel) around the manifold joints, and rings to prevent any vacuum leaks. You should use a proper 1 13/16" wrench for loosening, and tightening the original manifold nuts. These wrenches can be bought from the Indian Parts Dealers, or you can order one from MSC (1-800-645-7270), which is a "Martin Pump Wrench" (part number 88560677) for around $16.00. Properly tightening the Indian manifold nuts is essential!
Fuel Line And Filter
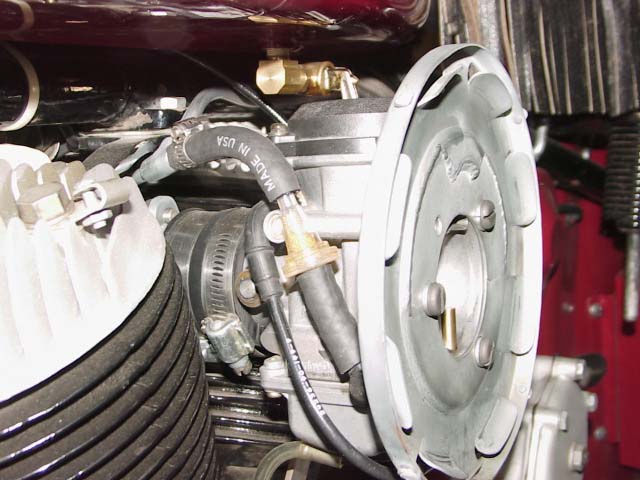
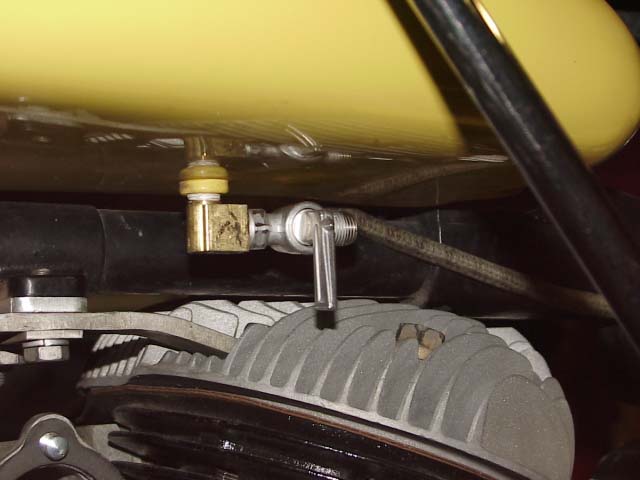
A new metal fuel line is included that replaces the original, because the petcock on the left fuel tank must be rotated to the rear for clearance. A 90 degree elbow is included. First fully drain the left fuel tank, and remove the petcock. Re-attach the petcock to the elbow with some teflon tape, and re-install it to the fuel tank pointing to the rear of the bike. The new fuel line should fit right up, and the tube can be easily adjusted to fit if needed. A filter with (2) short 1/4" rubber hose pieces are included. The shorter 1 1/2' piece goes onto the carb, and then the filter. Then the 3" piece goes from the filter to the metal line. The original fuel fitting on the carb can break off, because it is plastic. The H-D dealer sells a brass replacement (27371-76A) that is pressed in after the carb body is gently heated with a butane torch. Be careful! A hose clamp is included for the rubber hose at the metal line.
Throttle Cable Adapter

Included is a throttle cable adapter, which converts the original solid wire type cable to a modern flexible cable for the new carb. The original outer cable jacket must be shortened some. First remove the throttle grip, and pull out the center wire. Remove the outer jacket from the clamp on the front head's head bolt. Measure 5 inches from the edge of the clamp at the gas tanks front/lower mounting bolt, and cut it with heavy cutters. Grind, or file the end nice and flush. Re-install the inner wire, and fully install the twist grip. Roll the throttle to the full "Off" position, and pull out any extra slack on the inner cable with pliers. Measure exactly 2 1/4" from the outer jacket edge, and cut the inner wire. Note: I have seen (and presently use) throttle grip spirals that have a looser spiral pitch, that pull the cable farther for a given number of degrees of throttle rotation. I don't know the whole story yet on these different types, but I prefer the looser pitch, because they make more of a "Quick Throttle" feel. A quick throttle is a little harder to pull, but makes the bike feel more powerful. More of a psychological advantage! The throttle grip, and the cables must be in perfect working order, and lubed well with grease, because now the cable must pull open a carb against a return spring, and sometimes, a little drag on the cable will cause the twist grip to jam-up. It takes some work to get this right, but it certainly can be done.
To install the cable adapter on the original wire, first slide on the end piece onto the original cable jacket. Slide the aluminum "slider" over the wire inner cable past the (2) small set screws untill the end is almost into the drilled hole at the other end where the new cable barrel drops in. Tighten the (2) set screws with the provided 1/16" allen wrench tight. Throttle grip slack can be fine tuned by the position of this inner wire within the "slider". Install the larger end of the modern cable onto the carb. Slide the slider's outer tube over the new cable about 6". Attach the smaller barrel end of the new cable into the hole in the slider. Slide the outer tube fully to the left to engage it into the end piece that is on the original cable jacket. Now stretch the new cable's outer jacket (opening the carb) which exposes some of the new cable's inner wire to the right of the slider tube. Now slip on the other end piece with the slot over the inner wire, and fully engage it into the slider tube. Now let the cable end relax back into the recess of the slotted end piece. Check for slack in the cable. A little is OK. Alot of slack can be taken out by moving the slider further up the original throttle inner wire. Be careful. Measure twice, and cut once!
Important-Read Each Catagory Below for Full Details!
CONTACT INFORMATION:
James R. Mosher
1-505-466-7870