Indian Ignitions
The factory 6 volt Coil/points ignition is the worst ignition that an Indian can have (except for the factory magnetos, which are even worse!). The original coil/points distributor lets water get in, which over time corrodes the points, and when the cardboard insulator gets wet, it starts to rust, and will short-out the points, thus killing the bike far from home. I like to convert the points over to an electronic ignition module. It is always advisable to convert an Indian to a 12 volt system as well. Not only do you get a brighter headlamp, but you can get a hotter spark, which will make more power, and start easier. I like the "Cycle-Electric" generator, because they mount easily, and are bullet-proof. I have modified 6 volt Autolite generators to 12 volts with new field coils, but they really do need their armetures wound for 12 volts for best results. "Indian" Frank Vandevelde (1-618-937-4979 indianfrank@yahoo.com) can rebuild an Autolite generator, or do the 12 volt conversion for you. He does very good work. I have seen VW 12 volt generators, as well as small Japanese alternators used, but I still prefer the "Cycle-Electric" unit. With 12 volts, the actual running voltage will be up around 13.8 volts! A 6 volt system will only make around 6.8 volts while running.
Coils: Coils are not always the same, and the right coil "impedence" must be chosen for the application. A 6 volt system reguires a 1.8 Ohm coil in all cases. A 12 volt system should have a 3 Ohm coil, and I have found the best coil for a 12 volt Indian to be the Bosch "Blue" VW Beetle coil (# 9 220 081 083-74U ). They are a true 3 Ohm coil, and cost around $28.00 at European auto parts stores. You can paint it black, and it will look just like original. Any good 3 Ohm coil will also work well. You can read the Ohm rating right across the (-) to (+) terminals on the coil with wires disconnected. Use the lowest scale on the Ohm-meter to get a good reading. I have seen so many people go to NAPA, and ask for a 12 volt coil, and it is still a 1.8 Ohm coil for 6 volts. This is usually because they expect you to be using a ballast resistor between the battery, and the coil's (+) terminal. Always check across the (-) and the (+) terminals for 3 Ohms!
Ballast Resistor: A ballast resistor is used on 12 volt coil/points systems ONLY! It's reason is to cut down the batteries 12 volts to no more than 8 volts at the coil's (+) terminal. Points will begin to burn at anything higher than 8 volts! The ballast resistor is between the battery, and the coil's (+) terminal, and the coil's (+) terminal should be checked for no more than 8 volts while the motor is running. Since a 6 volt system never reaches 8 volts at the coil, a ballast resistor isn't necessary. If a pointless ignition module is added to the distributor, there are no points to burn, so a ballast resistor is not needed. The benefit is that the coil will then get the full benefit of 13.8 volts when running (not 8 volts), and the spark will be almost twice as strong! A stronger spark allows for a wider gap on the spark plugs as well. A 12 volt electronic system using a 3 Ohm coil will definitely make more power! Starklite Cycle Parts (1-888-752-4632) sells the best pointless ignition that I have tried. It uses a reliable "Pertronix" module.
Spark Plugs: I have seen all kinds of plugs used in Indians, and the only one that I will use (in ALL Indians) is the (NGK BP7HS #5111). This is a medium heat range "Projected Tip" plug of very high quality. When used on a 6 volt system, set the gap at .025". When used on a 12 volt system, set the gap at .035". When used with a magneto, set the gap at .020"-.025" (use .020" if the bike starts hard). NEVER use Champion plugs!
Timing: Ignition timing is very important, and most people don't pay attention to correct timing. The factory stamped their flywheels at, or near 38 degrees advance with a ($) sign. The 80"ers were even above 40 degrees! These numbers are way too high for today's fuel! I have done extensive research on ignition timing for Indians on my dyno, and they need to be significantly retarded. I have found that a 74, or 80 Chief using a Linkert should be set at 29 degrees full advance, and when using a Keihin CV carb, the full advance should be at 22 degrees! A 45" or 58" Scout should be at 30 degrees full advance, and since they are so easy to start, you can "lock" the timing at 30 degrees full time for better power. The upper timing bracket on the distributor needs to be modified to limit the amount of advance travel, so that at full retard, you will be at TDC (0 degrees advance)! This is covered in my CV carb section. Timing should always be checked with a timing light, and you can easily stamp your flywheels with timing marks that you can color with some paint, so you can see the full advance mark with a timing light. This page www.performanceindian.com/Timing.html will describe how to stamp the flywheels, and modify the upper timing bracket. When trying to set the timing with a buzz-box, or meter, you can be off by over 5 degrees! Use a timing light!
People often ask me what the "$" sign is on the flywheels. I say, if you set the timing there, it will cost you money! Over advancing a motor creates alot of extra heat, because it fires too soon, and the explosion happens before the piston gets to the top of stroke, so you lose power, and retain wasted heat. With proper timing, the motor runs cooler, makes more power, and saves gas.
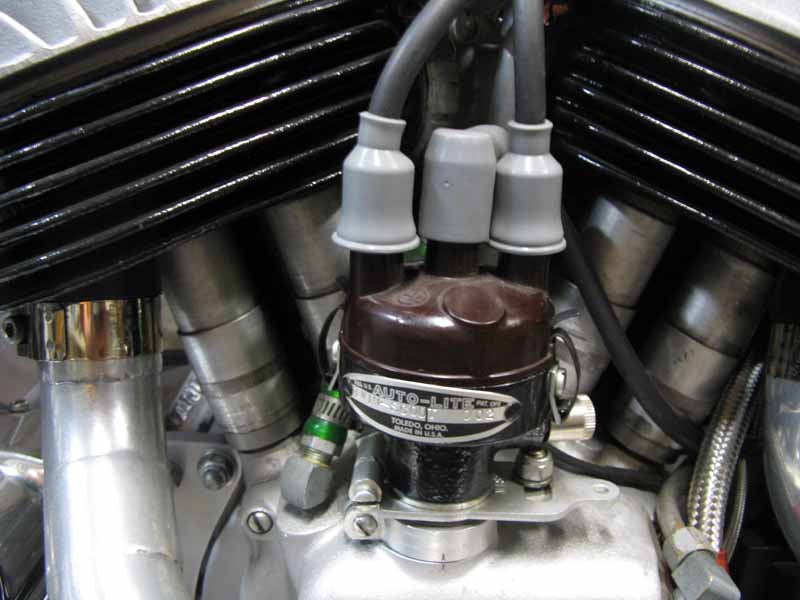
Magnetos: Factory magnetos are troublesome, hard to adjust, and make weak spark. Sell them on E-bay! I like the "Morris Magneto". The Joe Hunt magneto doesn't seem to be as well made, and has mounting issues. I have seen the need to increase the size of the condensor for these mags, and it's easy to hang a 2nd condensor on the outside for more capacitance. Under heavy load, a mag can start to break-down, and the 2nd condensor seems to help. Set the mag points at .015", and keep the points clean. They say you can never sand, or file the mag points, because any super fine particles left behind will keep the points from fully closing. Mag points don't do the same job as with a battery/coil system. The mag points are platinum, and carry very little current. If they need cleaning, I use a thin strip of 600 grit sandpaper, and I gently pull it through the points while relieving some of the spring tension off the points as I drag the 600 grit strip through the points. Then after the points look good, a take a "papery" non-shiney busines card, and wet it with lacquer thinner to drag through the points to wipe away any fine debris particles. Then check for .015" gap, and reset the timing. A mag's timing MUST be checked with a timing light, because there is so much gear slop, and magnetic pull on the armeture, that it is virtually impossible to "static time" a magneto. Use a timing light! Magnetos use common solid-core wire to the spark plugs (never resistor wire!). Pay close attention to your mounting system, because magnetos create alot of magnetic drag, and the mags want to twist right off their base. I see mags mostly used on Hot-Rod Scouts, and they should be locked down at 30 degrees full advance at all times. You don't need to retard them!
Spark Plug Choices
I have found the best performance from NGK spark plugs. The spark plug gap depends on whether you use a 6 volt, 12 volt, or magneto system. For 6 volts, use a .025" gap. For 12 volts, use .035" gap. For magnetos, use .020" gap (and a platinum plug like a NGK-B8EGV Racing plug). Scouts use a short 1/2" reach thread insert in their heads, so you must use a 1/2" reach plug (NGK-BP7HS projected tip plug). But for Chiefs, you might be able to use the longer 3/4" reach plugs (NGK-B7ES non-projected tip plug). These are common on British bikes. Take a look at the Chief's threaded insert in the head. If it is 3/4" deep in threads, then you should use these longer plugs. When using them, you do not want the Projected Tip plugs. The NGK-B7ES plugs will put your spark closer to the combustion chamber for better flame propagation. Auto parts stores use NGK's 4-digit part numbers as follows: NGK-BP7HS (5111), and NGK-B7ES (1111). Never use Champion plugs!
News Flash
NGK has recenly discontinued making "Non-Resistor" spark plugs like the plugs mentioned above. So find some soon, or you won't be able to. Look on Ebay, or Amazon, and good luck. I discovered that there is a "NGK BP7HS-10", which I was unaware of, and on the NGK website, I compared it to the "NGK BP7HS", and it appears that the only difference is in the factory gap setting. The "-10's" are gapped at .039", and the others are at .028". Since we need to gap our plugs at .035" for 12 volts, and .025" for 6 volt, either plug will be the same as each other. The "NGK BP7HS-10" has a part number of: (7829). They seem to be easier to find. If you have no choice but to get the Resistor plugs, then the new plug is a "NGK BPR7HS", part number (6422). A Resistor plug is for blocking radio interfence, which can screw up modern electronics in new cars. The Non-Resistor plugs will carry more amperage for a hotter spark in a high performance motor. We don't have the high compression, or boost, where this amperage is needed. So, I would bet that the Resistor plugs would work just fine for our needs. I still believe that NGK is the best plug for Indians, so don't go for an alternative brand.
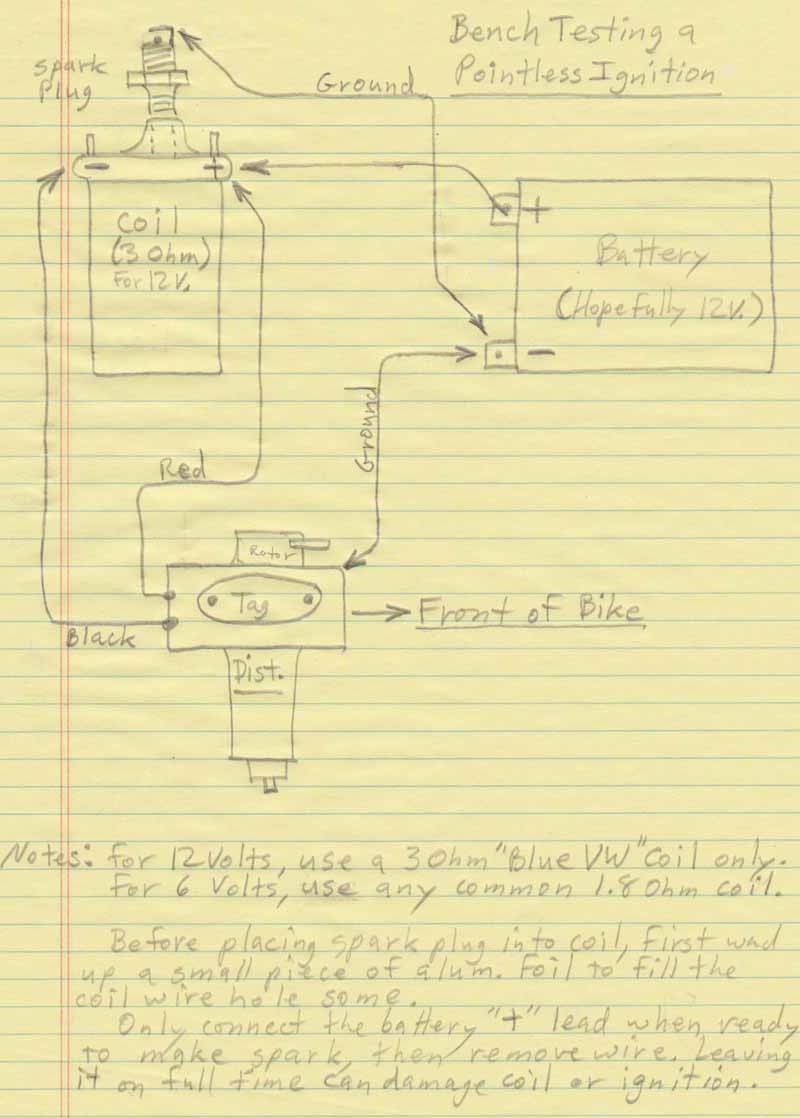
Installing a Pointless Ignition, and Bench-Testing
Congratulations on choosing the Pointless ignition for your Indian V-Twin. I really like them, and I use them on my Twin-Scout, and all my other Indians. Ignition timing is so very important to get an Indian to run best, and the subject is often mis-understood, and ignored. I would like to share how to get the most from this ignition setup. First, you can do a simple bench-test to do (2) things. One is to just see if everything is going to work, and the other is to place (2) marks inside the distributor that will line up at the exact point where the front cylinder would fire in actual operation. This is an important step, because it will ease the installation of the distributor into the oil pump for a first-time startup. Assemble your coil, battery, spark plug, and distributor with the ignition module installed just like my sketch below shows. WARNING! Only connect the battery "+" lead when you are turning the distributor for spark, otherwise it can ruin the coil, or ignition module! On ALL Scouts, and Chiefs, the original rotor is supposed to be pointing at, or near the front of the bike, when the front cylinder is firing. So, in all cases, you are doing timing, and timing setup based on the front cylinder. You will also need the distributor mounted at it's best position, where the distributor tag is facing outwards to the right, and of course, the rotor is pointing forward, when the motor is rotated showing the front cylinder's firing timing mark (in the inspection hole) on the compression stroke. You need to get this right, so the rear cylinder will be firing at it's correct point as well.
Some important notes on installing, and "Clocking" the distributor position. The best place for a distributor is where you can find the correct timing range (TDC - Full Advance), and the spark plug wires don't rub on your shifter linkage. At mid-range of the advance, the plug wires on top of the cap should be exactly front to rear, so at Retard the wires are twisted slightly off center in one direction, and the same amount the other way for full advance. Get it? I hope so! This can be achieved whether using points, or pointless ignitions. You will again set the flywheels for the firing full advance position for the front cylinder, and leave it there. This will take out all the cam gear slop towards the distributor. You will find the rotor will freely move CW, and CCW through several degrees, but when the motor is running, it will be held CCW against all of the driving components, so always try to keep the rotor slop out, by keeping it held CCW as far as it will go. Now, the distributor has a straight blade that engages a groove in the oil pump drive shaft. That is also a source of slop, that won't matter when it is running. Now, the gear on the rear cam shaft, and the gear on the pump drive shaft both have 13 teeth, so considering that the distributor shaft can be rotated 180 degrees, and re-stabbed into the pump, you will have 26 seperate positions where it can be dropped in. You will have to try almost all 26 positions where once it is installed, you get the correct firing position (points or pointless), and the plug wires are oriented front to rear. For Clocking the oil pump it is best to set the front cylinder at the mid-point of the timing range before trying to clock the oil pump gear mesh, so the distributor lands where the plug wires are straight forward, and it will rotate the same amount of retard as advance from this mid point of advance. I do all this before putting any gasket sealent on the oil pump, and installing for the final time. You can get this clocking position in a great spot if you take your time. Whenever I take a distributor off a motor, I always first rotate the motor for front cylinder firing, and make sure the rotor is pointing forward. I leave the motor position alone, and when I put the distributor back in, I just drop it in with the rotor pointing forward. To remove a pre-timed distributor, it is best to remove the shouldered bolt that connects the upper, and lower timing brackets, without disturbing the lock screws for the pump body sleeve, or the distributor clamp. It will always go back together with the original timing before distributor removal.
The next very important thing for a pointless system is to make (2) marks inside the distributor that line up to show exactly where the ignition fires the FRONT cylinder. Look at the picture below that shows some "White Out" painted on the ignition magnet ring, just under the rotor. Place a vertical mark as shown with a fine point Sharpie. Now, on your "Test-Bench" setup, and hooked up to power, as you rotate the rotor Clock-Wise in the direction of operation, you will see the spark plug fire. It will fire in both the front, and rear cylinder positions, but we are only interested in the firing of the front, so look closely where my picture shows an adjacent mark on the plate, and you will be placing another mark on the plate right next to the first "vertical" mark. This is the exact firing position of the distributor for the front cylinder. So, if you have the motor turned to the front Full Advance position on the flywheels, you drop in the distributor with the rotor pointing forward, install the shouldered bolt, advance the distributor advance brackets to full advance, loosen the upper timing bracket's pinch screw, rotate the distributor until the (2) marks line up, and you are within 2 degrees of perfect. Use a timing light to precisely set the timing once the bike is started, warmed up, and fully advanced. A proper setup for ALL Indians would be TDC for idle, and starting at full retard, while at advance, I have found that a Chief with a Linkert should be 29 degrees BTDC full advance. With one of my Keihin CV carb kits, the Full advance should be at 22 degrees BTDC, and a Scout likes 30 degrees BTDC full advance.
In the picture below the sketch, you can see the (2) marks lined up. To take this picture, I rotated the motor for the front cylinder firing at 30 degrees BTDC, and look at the marks. They are lined up at the firing point marks for the front cylinder firing. For points, instead of this pair of marks, you can use either a "Buzz-Box", Ohm Meter, or Cigarette paper between the points to establish the exact point of points opening. Again, you are always working with the front cylinder firing position at the flywheels, versus the moment of points opening when fully advanced (with the rotor pointing forwards).
Another thing that I like to do is to cut the wires of the ignition module at about 4" outside the distributor body, and solder plugs on this wire, as well as the long remaining portion of the wire, which will be routed through the chrome tube, and over to the coil. It is nice to be able to plug, and unplug the distributor for removal. I use common "SAE" plugs found at every auto parts store. They are the same plugs you will find on
Battery Tender" charge cords. Make sure to get the plugs on right. The "Red" lead coming from the coil is going to be hot when the key is on, so use the plug end, where the red wire of the plug is shielded in rubber, and the "Black" wire from the coil is un-protected. At the distributor, the "Red" plug lead solders to the red wire, and it's lead is exposed. The "Black" end of the plug is rubber shielded, and connected to the ignition module's black wire. Make sure the (2) wires inside the distributor won't touch anything that spins, and use a tiny spot of silicone to hold the wires down. Use some shrink tube over the soldered splices, and do a clean job. Park the connector behind the distributor, and it won't be seen. Or for that "ugly look", use black tape.
Bench testing a new pointless ignition, and marking a firing point.

CONTACT INFORMATION:
James R. Mosher
(505) 466-7870